
Before you begin
- Device - Use a desktop or laptop computer. Avoid using smartphones, iPads, or tablets.
- Internet connection - Recommended bandwidth of 5 to 10 mbps up/down or higher. Ethernet connection is recommended.
- Recommended browsers - Latest version of Google Chrome or Microsoft Edge
Last Updated: December 2024
Log in
- Open your internet browser and enter the Interprefy link you’ve been provided.
- Click the “I am a Meeting Host” box and enter your name and the password.

Pre-call Test
If activated for your meeting, you will next be prompted to set and test your audio and video settings on a pre-call test page.

- Camera - Select your webcam, turn on/off your camera and blur your background
- Microphone - Select and your microphone. Turn your mic on/off
- Audio - Select your audio output device. Click "play sound" to test correct audio output and listen to your recorded voice sample to hear how you will sound in the session
- Click Start Test to test your video, audio and network connection
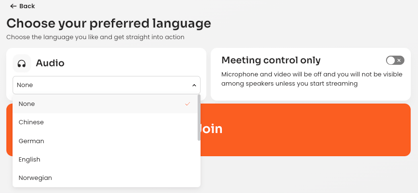
- Audio - Choose the language you would like to listen to interpretation in. Choose None to listen to the floor language (original language).
- Meeting control only - Click to join the call without audio or video, to join as a manager of the meeting, admitting participants and monitoring the chat.
- Click Join to enter the meeting
Note: the default set-up allows only 4 Hosts to log in per meeting, and there can be 8 streams in total on the floor
Call settings
If you don't see the platform overview after your test call, you will need to reload the browser. A pop-up window will then ask you to adjust your call settings for the meeting.
- Choose your the language you would like to listen to
- Select your audio device
- Select your video device
- Choose how you would like to connect:
- Meeting control only: without audio and video (choose this option if you only want to manage participants and the chat)
- Audio only: no video
- Video: with video and audio

All participants are notified when the Host joins the meeting, or upon login, if there is already a Host in the meeting.
Note: If the Host is not logged in, speakers will not have a ‘’Green Hand’’ icon to request the floor and participate on the event.
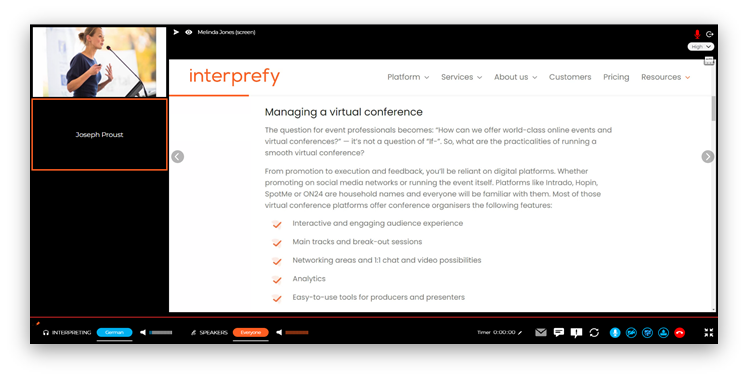
Platform View

- Select your preferred language - Or select "none" to hear the floor language. If you have languages with AI Speech Translation on your event, an AI icon will show next to them:

- Mic - Turn your microphone on/off.
- Webcam - Turn your webcam on/off.
- Screen sharing - Share your entire screen, application window, or browser tab. Please note Interprefy Connect Pro does not enable audio sharing when sharing a screen, a document or a tab. See next option if you wish to share video with audio.
- Upload and play prerecorded video - Use this option to share video with audio.
- Captions - If activated on your event, turn captions on/off.
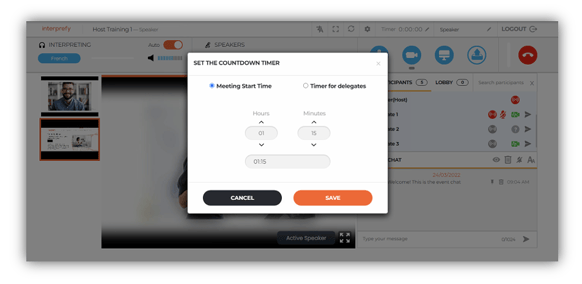
- Timer - You can activate a countdown to mark the start of the meeting by clicking on Timer and choosing "Meeting Start Time".
- Tone controls - Adjust the bass and treble levels, or let Clarifier select the best settings to make sound clearer. Learn more about Interprefy Clarifier here.
- All participants list- Shows who is in the meeting.
- Participants' status and control - Icons show the speaking rights of participants and grant and take away permission from a participant.
- Lobby - If lobby is activated on your event, here you can view and admit participants.
- Event Chat - Communicate with all participants and share files.

- Private chat with participants - Communicate with the participants privately.
- Remote support help chat - Ask questions, make comments, and/or resolve technical issues.
- Main Image on-screen - When "Active Speaker" is ON, the participant who is talking on the floor will appear enlarged on the screen. When the "Active Speaker" is off, the host can choose which video to zoom in on by clicking on the video.
- Full-screen mode - Enter/exit full-screen mode.
- Choose captions - Choose your preferred language for captions.
- Log out - Disconnects you from the platform.
Extended Features
How to share your screen, a tab or a document
- Select the screen-sharing icon (1)


3. Select the document or application window from the options provided. Remember to open the file or application you wish to share.
How to play a pre-recorded video
- Select the Interprefy upload video button (1)

- Upload video by dragging the video file from your computer to the Interprefy window OR find the video file on your computer and upload it.

-
Once the video is uploaded, click to insert video to screen button

-
The uploaded video will start immediately. Click on the pause sign (1) in the lower part of the video screen if you wish to pause it.

If you encounter issues, please check that:
- Chrome browser is up to date
- Hardware acceleration is disabled in Chrome settings.
Captions
Click on the three vertical dots to open the captions in a new window. Doing so, you can select multiple languages if you would like to follow captions in more than one language. You can also download captions in .txt format.

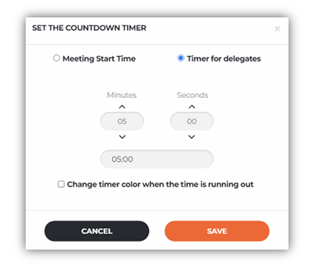
Selecting a Timer
Toggle the hours and minutes to set your preferred countdown, which will then be displayed for all participants.
Choose the second option if you wish to set a timer for delegates in case, for example, you wish to inform them of a specific time range to deliver their presentation. You can also change the timer color when the time is running out, which will turn the timer red.
Participants' status and control
By default, all event participants are muted, until streaming is permitted and enabled by the event host.
Next to each participant you can see different icons that indicate their current status. Use these icons to grant or take away permissions like floor, microphone access, or log participants out of the meeting.

- The participant is muted. Click it to unmute the participant.
- The participant is unmuted. Click it to mute the participant.
- The participant is "on-air" /has access to the floor. Click it to remove the participant from the floor.
- The participant does not have access to the floor. Click it to grant floor access to the participant.
- Sends a direct message to the participant.
- Logs participant out from the platform.
Participants' audio and video quality
If pre-call test is activated, you will also be able to see the audio and video quality of participants.

Editing participants' names
If this option is activated, you will be able to change the names of participants by clicking on the pencil icon next to their name.

How to grant floor access to participants
By default, audio, video, and screen sharing icons are greyed out for participants and they need to click on the "green hand" icon when they want to intervene.

You will then see the "green hand" icon (1) next to the participant's name:

To grant speaking rights to the participant, click the grey icon (2). The icon will turn red (3) and the participant will have control over their camera, microphone, and screen-sharing capabilities immediately.
When the participant has finished speaking, they can disconnect themselves or you can stop their streaming by clicking the red icon (3).
Lobby feature
If Lobby is activated, you will be able to admit or reject participants, either one by one or all at once clicking on Select all users.
Participants will see a message while they wait, and this message can be customised in the backend.
Once all participants are displayed, it is possible to select participants to send them back to the lobby or log them out of the event if necessary.
 |
 |
How to share a file
If this option is enabled, hosts can share files with other delegates, interpreters and/or attendees by using the event chat (1) and clicking on the "Files" tab.
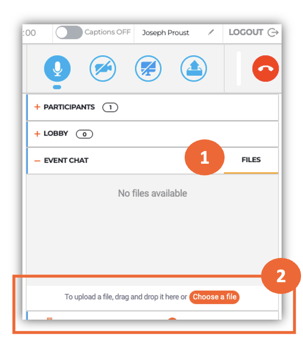
Files can be uploaded either by dragging them to the "Drag and Drop" section (2) or clicking on "Choose a file". If you wish to share multiple files, please upload them individually as each file needs to be pre-processed.
Click once on the bin icon to hide the file from participants, and click again to remove the file.

The maximum size of each file to be shared is 50 Mb. All major file types are supported.
For security reasons, the following file types are not supported:
.ade, .adp, .apk, .appx, .appxbundle, .bat, .cab, .chm, .cmd, .com, .cpl, .dll, .dmg, .ex, .ex_, .exe, .hta, .ins, .isp, .iso, .jar, .js, .jse, .lib, .lnk, .mde, .msc, .msi, .msix, .msixbundle, .msp, .mst, .nsh, .pif, .ps1, .scr, .sct, .shb, .sys, .vb, .vbe, .vbs, .vxd, .wsc, .wsf, .wsh
Full-screen view
In full-screen view, all the features are visible, except "All Participants List"
Switching Floor Languages in Interprefy Connect Pro
For events with multiple floor languages using Interprefy's AI solutions, the platform must be set to the language currently being spoken. This can be done automatically using AI-powered technology or manually by the event host or professional services. Selecting the correct floor language ensures that Interprefy’s live AI Speech Translation and Captions are accurate for all participants.
Automatic Language Switching
If your event uses automatic language identification, the spoken floor language is detected by AI-powered technology and automatically selected. This removes the need for manual intervention and allows smooth, seamless language transitions during the meeting.
Manual Language Switching
If manual switching is required, you can change the floor language directly from the Interprefy Host interface:
-
On the Connect Pro Host interface, in the Floor/Speakers section you will see available languages that can be selected.
-
Select the language that is currently being spoken on the floor.

By ensuring the correct floor language is selected — whether automatically or manually — you help guarantee the accuracy of real-time AI translation and captions for all attendees.