
Platform overview
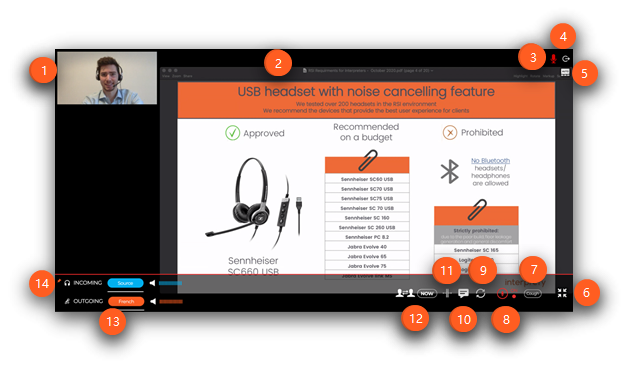
In default view

- Logo - Interprefy logo by default, it can be changed to the logo of the client or logo of the event.
- Event name - The name of the current event, changes from event to event.
- Role - The interface in use, in this case, the interpreters' interface.
- Language Settings - Opens the language options allowing interpreters to select/change their outgoing and incoming language channels.
- Full-screen - Enter/exit full-screen mode. It hides browser interface and shows only extended version of the current platform interface.
- Restart All Lines - To refresh your connection to the platform, when experiencing audio/video issues (will disconnect and reconnect within approx. 3-4 seconds).
- Settings - To adjust settings such as selecting the input audio device, apply Noise Reduction to your mic, activate keyboard shortcuts or other settings:

8. Tone Controls - To enable the Interprefy Clarifier and adjust the bass and treble sounds to make the input audio of the Floor clearer.

9. Username - Your name, entered during login and how your booth partner sees you on the platform.
10. Log out - It disconnects you from the platform. This will bring up a confirmation dialogue box:
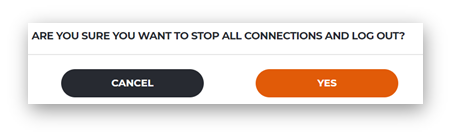
Click 'YES' to leave the platform. Closing Chrome will not log you out of the platform.
11. Incoming channels - Control the incoming audio, listen to Source (original floor audio) or your Relay language.
The blue volume bar controls the volume of your incoming audio.
12. Outgoing channels - Control your outgoing audio.
The orange volume bar controls the volume of your booth partner when they are interpreting.
For detailed guide how to set up your Incoming and Outgoing language channels, please visit:
How to set up the language channels on the interpreter's soft console
13. Streaming controls:
- Microphone icon - Turn your microphone on/off.
- Cough button - Momentarily pauses the mic as long as you hold the button.
- Camera icon - To share your video, visible only to your booth partner.
14. Handover section - Click on the 'Request' button to initiate handover to your interpreting partner.
15. Video - Shows the video/screen share being transmitted by the floor.
16. Channel chat - For messages between interpreting partners on the same language channel. Only visible to the interpreters in the same outgoing language and the Remote Support team.
17. All interpreters chat - Allows the whole interpreting team to share important information, tips and guidance which could be useful for any interpreter in any language.
Important note:
-
Remote Support team doesn't have access to the All interpreters chat. Make sure to follow messages in your Channel chat and communicate with Remote Support team there.
-
Using this chat while interpreting does not affect selected outgoing channels.
18. Quick messages - Opens a small window containing message prompts, allowing you to send messages to your Channel chat by clicking on the desired message.
You can add up to ten custom messages to use during the event by clicking on orange text 'Input new template here'.
19. Event chat - For messages from the hosts, speakers and Remote Support team. Announcements, important information, requests and replies will be displayed here.
'Files' button on the right side of Event chat gives you access to the files uploaded by the hosts.
20. Captions - For selecting desired captions, if available during your event.
21. Video stream full-screen - Enter/exit video full-screen mode. Controls are minimized when entering the video full-screen option, as shown below.
22. Remote support help chat - For emergencies, communicate directly and privately with a member of the remote support team. Only available if the event has remote support.
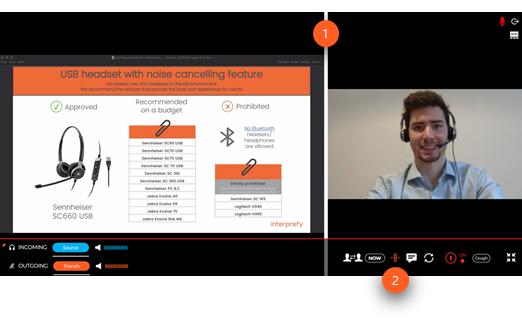
In full-screen video view
When you enlarge the video stream, all platform commands are minimized as follows:
- Change feed - To switch between video feeds. Click on it to make that image bigger and make it appear on the main video screen (2).
- Main video screen - Shows the video screen/screen share that you find more relevant.
- Mic - Red indicates mic is on and you are transmitting sound.
- Log out - It disconnects you from the platform. This will bring up a confirmation dialogue box:
5. Active speaker display - Enabled by default. It automatically switches the video feeds to always show the person speaking.
6. Full-screen - Enter/exit video full-screen mode.
7. Cough - To momentarily mute yourself.
8. Stream controls - A visual indicator of the microphone status.
9. Restart All Lines - Refresh your connection, when experiencing audio/video issues (will disconnect and reconnect within approx. 3-4 seconds).
10. Open chat -It opens the interpreters', event and remote support help chats.
11. Split-screen mode - Allows the platform to display 2 video feeds simultaneously.
12. Handover feature - To request a handover.
13. Incoming and Outgoing channels - Control the flow of audio being sent and received.
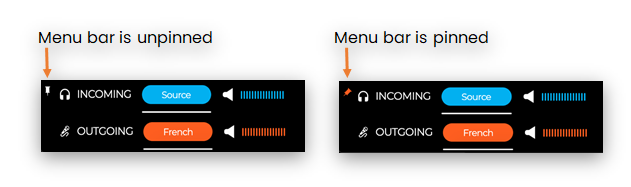
14. Lower menu bar pinned-unpinned - Hides or shows all the icons on the low menu bar when moving the cursor away.

In split-screen mode
This screen view allows the platform to display 2 video feeds simultaneously.
1. Resize video screens - Click and drag this bar to resize the video screens, making one smaller while simultaneously making the other larger.
2. Disable split-screen view - Click to exit this screen view.