
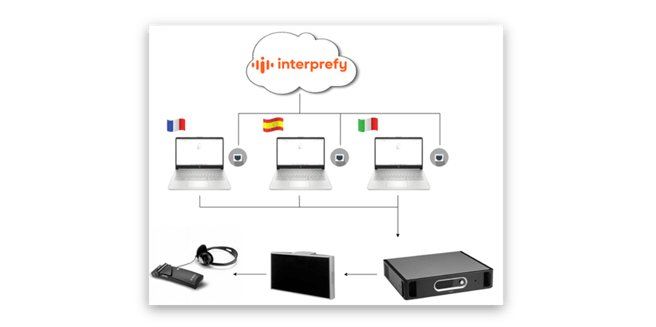
If your interpreters work remotely but your audience uses traditional infrared (IR) or radio-frequency (RF) receivers, you can bring the interpretation from the Interprefy platform into your venue's transmitter using the Interprefy Routing Panel.
The Routing Panel receives each language channel from the Interprefy platform and outputs it to a dedicated audio device, which you connect to the matching transmitter input. Receiving language channels requires Routing Panel: Advanced.
Before you begin:
- Laptop with Google Chrome or Microsoft Edge
- Cable or audio interface/sound card to connect to the transmitter input for each language
- Internet connection — allow 0.032 GB/hour and at least 0.5 Mbps per language channel. A wired connection is recommended.
- Routing Panel link provided by your Interprefy project manager
1. Connect your audio equipment
The physical connection can be made with a cable or an audio interface/sound card, depending on your requirements.
2. Open the Routing Panel
Open the Routing Panel link in Google Chrome or Microsoft Edge. When prompted, allow access to your audio devices.
In the Sound and language settings panel, select the floor language (if required) and click Join.
Up to 6 languages can be pinned in the panel at once. If your event has more than 6 languages, unpin one to pin another.
If you are also sending floor audio to Interprefy from the same laptop, select your floor input device here. See the User guide to connect Interprefy to your on-site event.
3. Set the Routing Panel to receive language feeds
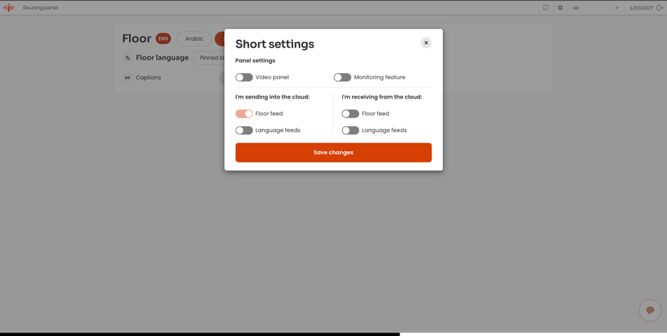
After you click Join, the Short settings window appears.
Under I'm receiving from the cloud, turn on Language feeds, then click Save changes. You cannot enter the panel until the changes are saved.
You can change these settings later in the Settings sidebar. Changing them stops all sending and receiving on the panel, so only do this during breaks or preparation.
4. Enable each language and start receiving
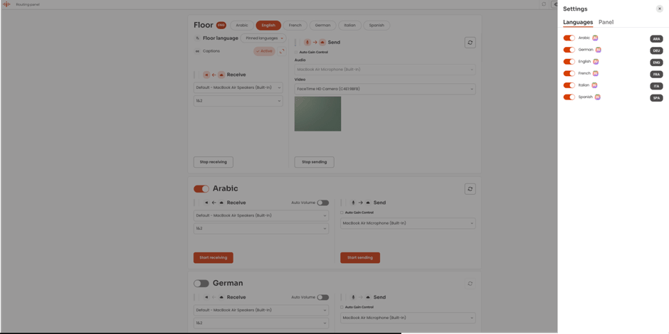
Each language channel has its own toggle and must be enabled individually. Languages you do not need can be removed in Settings.
For each language channel:
- Turn on the toggle next to the language name.
- Under Receive, select the audio output device connected to that language's transmitter input.
- Click Start receiving.
Auto Volume can be enabled for each language channel.
Each language channel has its own Reconnect button. It restarts that channel only, without interrupting channels that are working well.
For more information/assistance with AV requirements on-site, contact our team!